
Quick Look is a built in framework on macOS and iOS that lets you present file previews within your app. You may already be familiar with it on macOS where pressing the Space bar inside Finder will bring up a preview for certain files. On iOS, there are actually two ways to use Quick Look: with a document interaction controller (UIDocumentInteractionController) or with the framework directly (QLPreviewController).
For the purposes of this guide, we’ll be using a new iOS app project that has a navigation controller with a UITableViewController as its root. Inside the table source class we have a string array with the paths to some local files:
public static string[] Documents = {
    "sampledocs/gettingstarted.pdf",
    "sampledocs/Xamagon.png"
};
You can check out and download the complete sample app from Github.
Document Interaction Controller
The document interaction controller is built on the Quick Look framework and uses it to preview files. However as the name suggests, it can also enable other file interactions such as opening it with another app or copying and printing options.
Previewing a file
Previewing a file with a document interaction controller can be broken down into these steps:
- Create a document interaction controller for the file
- Assign a delegate and present the controller
Since we’ll need a delegate, start by creating a class that inherits from UIDocumentInteractionControllerDelegate. Because the document interaction controller automatically handles its dismissal, most of the delegate methods are optional. But in order to enable previewing you are required to implement ViewControllerForPreview.
This method willl need to return a view controller that the preview can use as a parent. In the case of our sample, we can use the root UITableViewController by defining a constructor in the delegate that takes a parameter. We then hold a reference to it so that we can return it later:
public class InteractionDelegate : UIDocumentInteractionControllerDelegate
{
    UIViewController parentController;

    public InteractionDelegate(UIViewController controller)
    {
        parentController = controller;
    }

    public override UIViewController ViewControllerForPreview
        (UIDocumentInteractionController controller)
    {
        return parentController;
    }
}
When you are ready to present a preview, create a new document interaction controller with the static FromUrl method inside UIDocumentInteractionController. by passing it a path to the file. Then assign the delegate and present the controller with PresentPreview:
var previewController = UIDocumentInteractionController.FromUrl(
    NSUrl.FromFilename(TableSource.Documents[indexPath.Row]));
previewController.Delegate = new InteractionDelegate(this);
previewController.PresentPreview(true);
Demo time!
Other presentation options
As I mentioned above, the document interaction controller can be used not just for previews. It also has two other presentation options, PresentOpenInMenu and PresentOptionsMenu, that will instead present options for opening or handling the file.
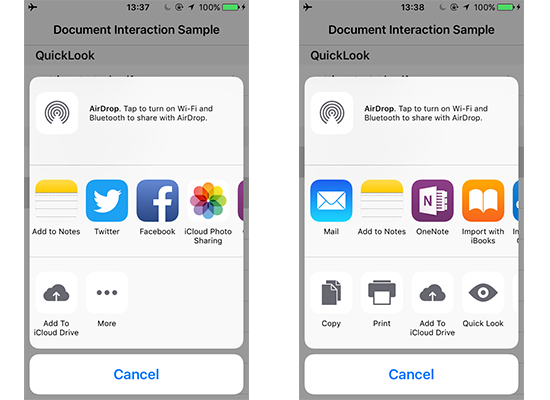
Comparing PresentOpenInMenu (left) and PresentOptionsMenu (right)
Quick Look preview controller
Where as the document interaction controller supports more features and relies on Quick Look for previews, QLPreviewController is a direct implementation of the framework. Because of this, it requires a little more setup:
- Create a data source
- Implement a wrapper for the preview items
- Create a Quick Look preview controller and present it
The biggest difference with the Quick Look preview controller is that it requires a data source. However, this allows it to display previews for multiple items at once unlike a document interactin controller.
To begin, create a new class that implements IQLPreviewControllerDataSource:
public class QuickLook : IQLPreviewControllerDataSource
{
    public nint PreviewItemCount(QLPreviewController controller)
    {
        return TableSource.Documents.Length;
    }

    public IQLPreviewItem GetPreviewItem(QLPreviewController controller, nint index)
    {
        return new PreviewItem(index);
    }
}
Since GetPreviewItem needs to return a IQLPreviewItem object, also create another class that inherits from QLPreviewItem. This will be the wrapper class for the preview items, so override the ItemUrl property to return a valid path for the selected file. Overriding ItemTitle is optional and can be used to customize the title shown for the file:
public class PreviewItem : QLPreviewItem
{
    nint itemIndex;
    NSUrl fileUrl;

    public override string ItemTitle
    {
        get { return fileUrl.LastPathComponent; }
    }

    public override NSUrl ItemUrl
    {
        get { return fileUrl; }
    }

    public PreviewItem(nint index)
    {
        itemIndex = index;
        fileUrl = NSUrl.FromFilename(TableSource.Documents[itemIndex]);
    }
}
Optional: Create a delegate for the Quick Look preview controller if you would like to include a zoom animation, determine whether a file can be previewed, or respond to the controller’s dismissal. You can use the same class as the data source by having it also inherit from QLPreviewControllerDelegate and implementing the methods you need:
public class QuickLook : QLPreviewControllerDelegate, IQLPreviewControllerDataSource
{
    ...
}
With the data source implemented, we can now put all the pieces together. When you want to present a preview, create a QLPreviewController and set its data source and optional delegate. Since the data source can contain multiple files, first set CurrentPreviewItemIndex and then push the controller onto a navigation controller or present it modally:
var previewController = new QLPreviewController();
var sourceDelegate = new QuickLook();

previewController.Delegate = sourceDelegate;
previewController.DataSource = sourceDelegate;

previewController.CurrentPreviewItemIndex = indexPath.Row;
NavigationController.PushViewController(previewController, true);
Preview multiple items!
Wrap up
If your app works with files, adding previews is a nice feature to add as it can help keep users stay within your app. Both the document interaction controller and Quick Look preview controller support more features than I covered here, but I hope this guide gets you started with the basics. Happy coding!